The shift to manual mode marked a clear turning point for the photographer. Professionals had spent days with a single species to find the right angle and light. Amateurs, with limited time, rarely reached that depth of control.
Before each outing, they researched locations and animal behavior. That preparation made time in the field far more productive. Learning the exposure triangle became the first practical step toward consistent results.
By taking charge of the camera, the artist moved beyond the machine’s guesses. Exposure, shutter speed, and aperture were tuned to match conditions. This change let images reflect a clear creative vision instead of automatic compromises.
The guide that followed explored how the switch from automatic to manual exposure raised the quality of images. It explained why mastering this one thing separated casual shooters from those producing professional-grade photos.
The Shift to Manual Wildlife Photography
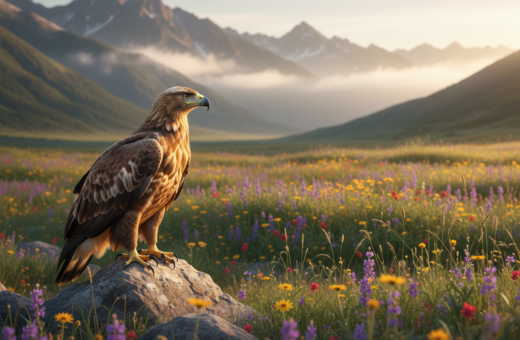
When the photographer began setting exposure himself, every outing felt like a focused study. In Tanzania he captured a lilac-breasted roller, a vivid example of how intent and camera control improve images.
Akari Photo Tours listed top locations such as the Maasai Mara and Antarctica, showing where birds and mammals offered rich subject opportunities. The field demanded research into migration and breeding seasons so each approach was informed and timely.
Key practices helped make the change practical:
- Study species behavior to anticipate movement and position the subject.
- Practice rapid camera adjustments in varied light to turn a good photo into a great one.
- Consider a specialized course to learn exposure control and gear use.
“Patience and the right gear allowed the photographer to document the natural world with intention.”
Taking control allowed photographers to adapt to unpredictable scenes and produce consistent, professional images in the field.
Understanding the Exposure Triangle
Getting brightness right is the single biggest step toward consistent, high-quality images. Brightness controls mood, detail, and the legibility of a subject in changing light. The exposure triangle — aperture, shutter, and ISO — is the practical map for that control.
The Role of Brightness
Exposure is fundamentally about brightness. When brightness is correct, a photo shows texture, color, and depth clearly. Too much or too little light hides important detail and flattens a scene.
Balancing Settings
The three settings must be balanced in the photographer’s mind to react fast to a dynamic subject like wildlife. A wider aperture increases light and alters depth field. Faster shutter speeds freeze motion, while slower speeds let motion blur for creative effect.
- Balance aperture, shutter, and ISO to aim for correct exposure in any lighting.
- Use appropriate shutter speeds to secure a sharp shot of moving subjects.
- Think of aperture shutter interactions as the foundation of confident camera control.
“Master the triangle and the camera will follow your intent.”
Why Automatic Modes Limit Creative Potential
Automatic settings often paint every scene with the same neutral tone, erasing mood and intent. The camera assumes an average mid-tone and biases exposure toward middle gray.
When shooters rely on aperture priority or shutter priority, they still let the device pick critical values. That can leave the artist reacting to the meter instead of shaping the frame.
Many enthusiasts find the meter is easily fooled by high-contrast scenes. A black subject or a bright sky will pull readings the wrong way and produce poor exposure.
- Aperture priority helps control depth of field but limits tonal choices.
- Shutter priority freezes action but may force unwanted ISO jumps.
- Full control over settings frees the creator to make deliberate images.
“To truly excel, photographers must move beyond safety modes and learn to set each exposure with intent.”
Moving to manual mode lets one shape light, contrast, and mood. For serious wildlife photography, that step unlocked more expressive, keeper photos.
Mastering Shutter Speed for Sharp Subjects
Choosing the right shutter speed determines whether a moment is frozen or expressed as motion. The shooter must think fast and plan for the subject’s pace before the frame is taken.
Freezing Fast Action
For most wildlife shots, a default shutter speed between 1/400s and 1/1000s keeps the subject sharp. When a bird is in flight, increase the shutter to at least 1/1600s or 1/2000s to freeze wingbeats.
Slow Shutter Techniques
Slower-moving subjects, such as moose or bison, often need only about 1/200s for a clear photo. Slower shutter choices can add creative blur to backgrounds while the subject remains readable.
Subject Movement
The camera must use higher shutter settings when a subject moves toward the lens to avoid motion blur. Always aim to put the subject’s eye in sharp focus; that detail sells the shot.
- Practical tip: Overshoot your shutter speed slightly to guard against camera shake.
- Practice in the field to match shutter speeds to real behavior and secure keeper images.
“Mastering the shutter lets the photographer control how time appears in every image.”
The Role of Aperture in Depth of Field
Adjusting aperture changes which parts of the frame hold the viewer’s eye and which fade away.
The aperture is the primary tool for controlling depth field. A wider opening like f/2.8 lets more light into the camera and creates a soft background that isolates the wildlife subject.
For a bird or small subject, a narrow depth field draws attention to the eye and main form. Professionals often favor a large aperture to make the subject stand out in cluttered scenes.
The aperture also controls how much light reaches the sensor, which matters in low-light situations. By changing this setting, the photographer alters how the camera renders texture, contrast, and mood.
- Tip: Start wide to isolate, then stop down to add context.
- Experiment with different stops to learn how depth field affects images.
- Balance aperture with shutter and ISO to keep the frame properly exposed.
“Mastering aperture unlocks creative control and lifts routine shots into professional images.”
Managing ISO in Challenging Lighting
In low or shifting light, managing ISO keeps the intended shutter speed and aperture intact. This lets the shooter hold a chosen depth field and freeze motion without the camera guessing every value.
Auto ISO Considerations
Modern camera sensors handle Auto ISO well. Many professionals use Auto ISO to preserve a set shutter speed and aperture while the camera adjusts sensitivity for correct exposure.
Practical approach: shoot in manual mode with Auto ISO to control aperture shutter and speed, then monitor results. Use exposure compensation when the meter is fooled by high-contrast conditions.
- Use aperture priority or shutter priority with Auto ISO as a bridge into full control.
- Check images often to avoid the camera selecting an ISO that adds visible noise.
- Remember that proper ISO management maintains image quality in difficult conditions.
“By balancing ISO, aperture, and shutter speed, photographers capture clean, sharp photos in almost any light.”
The Mirrorless Advantage for Exposure Control
Seeing the exact result in the viewfinder removes guesswork and speeds decision-making in the field. A mirrorless camera offered a true WYSIWYG preview, so changes to exposure and color appeared before the shot.
Live preview helped photographers adapt to shifting light quickly. They adjusted shutter, aperture, and ISO and watched the result in real time. That cut missed frames and improved keeper rates for subjects on the move.
Focus coverage across the entire frame removed the need to focus and recompose. Tracking the subject’s eye became more reliable, which raised the percentage of sharp, engaging images.
- The mirrorless camera showed the world exactly as the sensor captured it.
- Real-time exposure preview made correct settings easier in changing light.
- Wider focus point coverage allowed creative framing without extra steps.
“Switching to mirrorless gave them direct control over exposure and tracking, improving results in the field.”
Utilizing Back Button Autofocus
Back button autofocus puts focus control directly under the photographer’s thumb, changing how shots are made in the field.
Separating metering from focus lets the camera meter exposure while the shooter controls focus independently. This separation prevents the shutter button from toggling focus and light decisions at the same time.
Separating Metering from Focus
With focus on a rear button, one can lock the subject and recompose without the camera hunting. The setup gives reliable results in high-contrast light and makes it easier to keep the eye sharp.
Improving Keeper Rates
Practically, this raises keeper rates. The shooter switches instantly between single-point and continuous AF without moving from the viewfinder. That saved time often equals a saved photo.
- Pro tip: assign AF to a dedicated rear button on the camera or DSLR.
- Lock focus on the subject’s eye and hold while composing the frame.
- Use this way to keep continuous focus when the subject moves and cut camera hunting.
“Keeping focus separate from the shutter is a simple change that improves control and results.”
Pre-Visualization and Research Techniques
Careful research lets a photographer arrive in the field with a clear vision of the moment they want to capture.
Research habitats, migration, and breeding seasons to know when birds and mammals will appear and behave predictably. This planning saves time and raises the chance of good images.
Create a reference folder of images and short notes. Study examples of posture, approach angles, and where the subject places its eye in the frame. Watching video clips of behavior also builds a mental script for the shoot.
For example, studying the white head of a Bald Eagle teaches exposure control to avoid blown highlights. With that prep, the camera settings are chosen before the moment arrives.
- Pre-visualization helps plan composition and exposure in advance.
- Study specific bird or mammal behavior to anticipate movement and set shutter and ISO.
- Well-planned shoots produce a higher ratio of keeper photos and reduce wasted time.
“When the moment comes, preparation lets the photographer capture the frame exactly as imagined.”
Handling Difficult Lighting Conditions
Strong, changing light forces quick decisions that separate average images from memorable ones.
In high-contrast scenes the camera’s meter can be easily fooled. Dark subjects or bright backgrounds often yield underexposed or overexposed photos. Using exposure compensation helps correct those errors fast.
Dealing with High Contrast Scenes
They often choose mode deliberately. Switching to full manual allows the shooter to override the meter and lock in the intended look.
- Use manual mode when the meter struggles; set shutter speed and aperture for the subject and adjust ISO as needed.
- Many prefer aperture priority when light changes rapidly to keep the desired depth field steady.
- Practice in varied conditions so the camera feels like an extension of intent during real shoots.
The key is awareness of the light and quick, confident changes. With practice, difficult scenes become opportunities to create striking photos of wildlife and nature.
“By managing exposure and staying aware of light, a challenging scene often becomes the best image of the day.”
The Importance of Proper Gear Selection
A careful choice of camera and lens turned difficult light into opportunity rather than an obstacle.
Equipment determined field success. A fast, reliable camera let the shooter capture split-second motion and preserve detail. Lenses with strong reach and wide apertures improved image quality and handled low light in tough conditions.
Weight and size mattered for long hikes. Heavy rigs wore down even the most patient shooter, so many chose bodies and glass that balanced performance with carry comfort.
Durability counted. Weather-sealed bodies and lenses protected gear from dust, rain, and salt spray. That resilience kept a session alive when the weather shifted.
- Prioritize a camera with reliable autofocus and high frame rates.
- Choose lenses that match your reach and low-light needs.
- Factor weight, build quality, and sealing for field conditions.
“Investing in the right equipment let the photographer focus on composition and timing, producing professional-grade images.”
They researched gear before trips, matching tools to the species and conditions expected. Good selection reduced compromises and made capturing the perfect photo more likely.
Field Tactics for Dynamic Wildlife Behavior
A photographer who read animal cues spent less time reacting and more time creating compelling frames. They set up their camera and body position to match the likely movement of the subject.
Positioning mattered. By choosing angle and distance, they ensured the background complemented the animal and did not distract from the main form.
Quiet movement and patience preserved chances to capture birds and other active subjects. When the action rose, staying calm helped keep focus sharp and consistent.
Understanding behavior let them pre-set shutter and exposure so the right light hit the sensor at the right moment. They managed depth field to keep the subject isolated and eyes readable in the frame.
- Anticipate actions by studying routines before taking a single photo.
- Move slowly to avoid startling nearby subjects and losing valuable time.
- Adapt settings on the fly as light and behavior changed.
“Adapting to changing behavior separates a successful shooter from one who misses the shot.”
Avoiding Common Exposure Mistakes
A reliable checklist cuts errors when shooting fast-moving subjects.
EFFF — Expose, Focus, Frame, Fire is a simple mental process that helps the photographer confirm settings before they take a shot. They check exposure, lock focus on the subject, compose the frame, then fire the shutter.
Cameras can be fooled by high-contrast light, so use exposure compensation or switch to full manual mode when the meter fails. That way the aperture, shutter, and speed match intent, not the camera’s guess.
Many rely on automatic mode and miss subtle cues. The result is blown highlights or blocked shadows in key areas like the subject’s eye.
- Check shutter speeds and shutter priority choices for motion.
- Verify aperture and depth field to keep the eye sharp.
- Review photos often to confirm settings suit changing light and conditions.
“A short, ordered checklist prevents simple mistakes and raises keeper rates.”
Refining Composition Through Manual Control
With full control over settings, the artist can shape each frame to emphasize intent and balance.
Choosing aperture determines depth field and isolates the subject from distracting backgrounds. A wide opening pulls attention to the eye; stopping down adds context around the animal without losing clarity.
Manual mode also frees the shooter to place the subject anywhere in the frame. They can move off-center, use negative space, or align the subject with natural lines in the field to guide the viewer’s eye.
Practice in the field makes these choices instinctive. Each frame becomes an opportunity to refine balance, leading lines, and the visual story the photo tells.
- Isolate the subject: control depth field to highlight key details.
- Compose with intent: place the subject for stronger impact.
- Review and adjust: small changes to aperture and placement improve images over time.
“Every shot is a chance to develop a unique style and create images that stand out.”
For technical guidance on exposure while refining composition, see a short guide to master exposure. By pairing control with composition, photographers elevate simple photos into visually engaging work.
Post-Processing and Image Review
After a long day in the field, careful editing refines intent into the final frame. This step is the final part of the workflow that lets the photographer bring out the best in each photo.
During image review, check sharpness, exposure, and composition first. Confirm the subject and the eye are readable. Note how shutter and speed choices affected motion rendition.
Use exposure compensation in the field when possible to reduce heavy corrections later. The shutter speed and aperture set in the field shape the image’s feel and depth field after editing.
- Consistency: build a simple order for ingest, cull, edit, and archive.
- Review: mark keeper frames, then batch-correct light and exposure where needed.
- Learn: analyze failures to improve the next outing.
Post-processing is not about fixing bad photos but about refining good ones. For practical starting steps see a concise post-processing primer that many wildlife photographers recommend.
“Editing should honor the scene you saw, not erase it.”
Conclusion
,Learning to set exposure deliberately gives every photographer a clearer link between intent and result.
Mastering manual mode is a transformative journey that raises technical skill and creative control. It helps them capture the natural world with more precision and purpose.
Moving away from automatic settings lets a shooter produce professional-grade images in varied light. With steady practice and patience, progress comes quickly.
Great photography blends technical skill, focused research, and a genuine love of the subject. Keep practicing in the field and review each outing to build confidence.
They can now take full control of their camera, apply these principles, and expect their wildlife photography to improve day by day.