Kevin A Pepper argued on May 15, 2024, that a clear background often beats an expensive camera when creating a strong image.
He showed that beginners in wildlife photography can improve photos by managing what sits behind the subject. A cluttered backdrop can ruin an otherwise perfect photo, even with top gear.
Skillful use of aperture and lens choice, plus attention to light and focus, lets a shooter isolate the subject. Studying a bird’s habits and picking the right spot in the field helps capture the right time.
Practical tips and patience yield professional results. Technique, not just the camera, guides better photos and cleaner backgrounds that complement the subject.
Why Wildlife Photography Backgrounds Outperform Camera Specifications
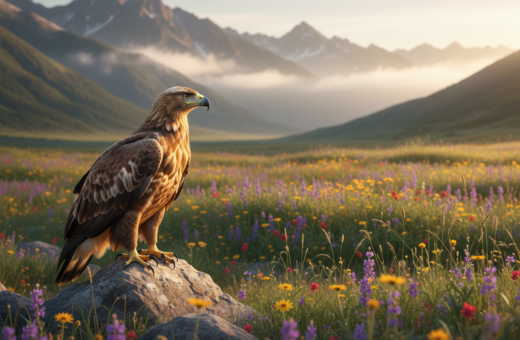
When Kevin A Pepper swapped a Canon 500mm f/4 for a Sony 200-600mm f/5.6-6.3, he found the same truth held: subject separation mattered more than the make of the lens.
By watching a Sandhill Crane, a photographer sees how distance between the subject and the background creates clear isolation. This distance often beats technical camera differences when making a photo look professional.
“A skilled photographer places the animal, light, and angle to control space — not the camera model.”
Key points:
- Distance from subject to background shapes perceived separation.
- Lens angle can change how much the subject stands out.
- Light and timing often trump camera specs for better photos.
- Planning and position are the tools that produce the best results.
In short, prioritizing spatial relationships makes cleaner, more compelling images regardless of gear.
Mastering Field Techniques for Subject Isolation
Small choices in the field make the biggest difference when isolating a subject for a clear image. The photographer watches movement and waits for the right moment, such as a Yellow Warbler settling against clear sky. That simple timing removes clutter without extra gear.
Optimizing Subject and Background Distance
When possible, increase the distance between the subject and the background. A longer gap makes the subject pop and eases focus control. Using a prime lens at f/4 or f/5.6 helps blur a busy environment and keep attention on the bird.
Utilizing Foreground Elements to Diffuse Clutter
In flooded woodlands, twigs and peat moss create busy scenes around Prothonotary Warbler nests. A photographer can press the lens hood lightly against nearby leaves or use branches to create a soft foreground veil. These actions diffuse clutter and guide the eye to the subject.
Adjusting Camera Angles for Better Separation
Lowering the camera angle often improves separation between an animal and its environment. A slight change in angle can place a sky or open space behind the subject at the right time of day when light is favorable.
- Field tip: Wait for the bird to move to a clear branch when possible.
- Field tip: Use lens hood contact to blur foreground clutter.
- Field tip: If field fixes fall short, Photoshop AI Generative Fill can remove final distractions.
“Adaptation in the field and careful framing deliver cleaner photos long before post-processing.”
Creative Approaches to High-Key Wildlife Imagery
A high-key approach turns bright snow into a tool that isolates the mountain hare and clarifies the frame.
Technical setup: Use spot metering on the hare to keep the subject properly exposed against a blown white background. Set the camera to aperture priority so the photographer controls depth of field while the camera adjusts exposure for the scene.
Choose a wide aperture on the lens to blur any busy environment and keep focus on the animal. Angle the light so it skims the hare and adds subtle modeling without restoring strong shadows.
Essential Camera Settings and Post-Processing
- Spot metering ensures the subject retains detail in bright conditions.
- Aperture priority lets the shooter manage depth while exposure auto-corrects for snow.
- In post, pick the correct spot in the frame to lift the background to pure white without clipping the subject.
“High-key work depends as much on light and angle as it does on gear.”
Result: Mastering these steps produces a clean image that stands apart from standard field photos.
Conclusion
Conclusion
Careful control of what sits behind the subject frequently makes the biggest visual difference. Managing the scene, light, and lens choice produces cleaner results than focusing on gear alone.
Apply the field tips — change angle, add soft foreground elements, and increase subject-to-background distance — to isolate a bird or animal and lift the overall composition. Patience remains essential: waiting for the right light and pose pays off.
Whether using an expensive lens or a budget option, consistent practice of these techniques builds a portfolio of striking photos. For guidance on color and mood when blending scenes, see this primer on matching cool and warm colors.